
Priority Queue With Heap (Part 2)
ဒီ part 2 article ကို မဖတ်ခင် part 1 ကို အရင်ဖတ်ထားမှ အဆင်ပြေပါလိမ့်မယ်။ အောက်က link မှာသွားဖတ်လို့ရပါတယ်။
http://bit.do/e3KCv
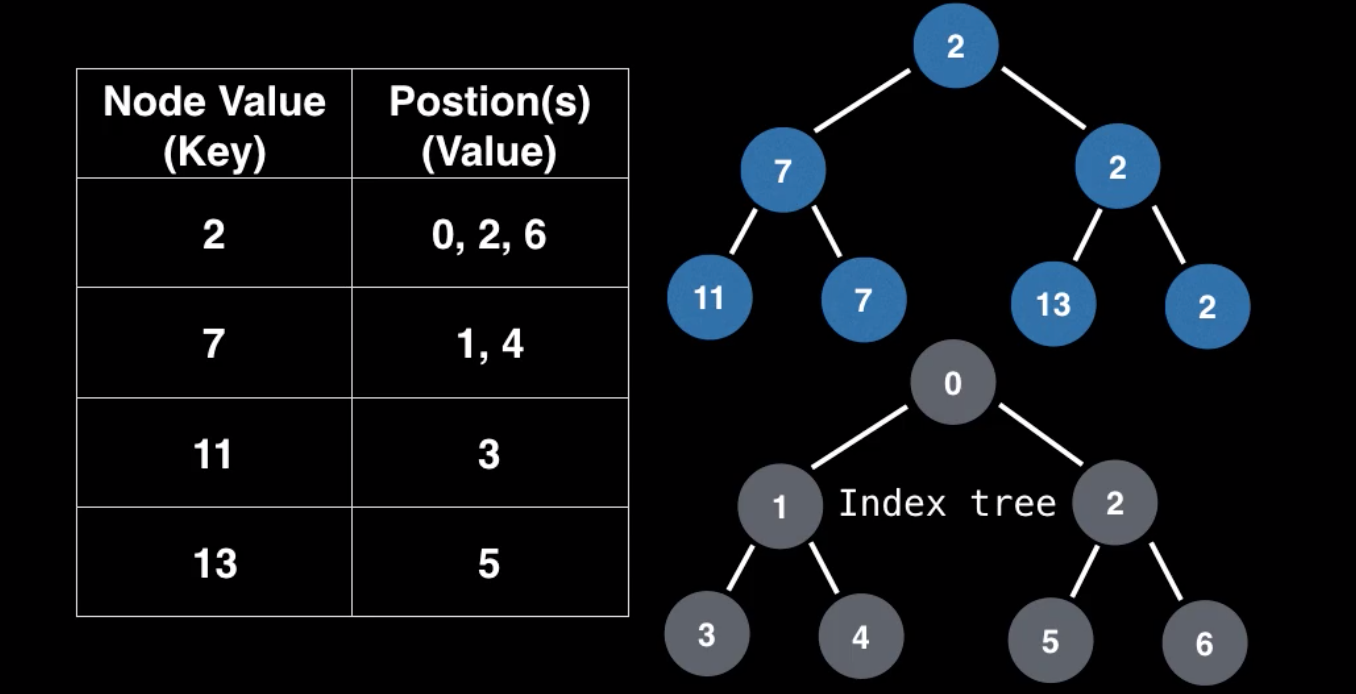
Part 1 မှာရေးခဲ့တဲ့ မူလ remove algorithm က key တစ်ခုရှာပြီဆို tree တစ်ခုလုံးပတ်ရှာနေတဲ့အတွက် efficiency မကောင်းဘူးလို့ဆိုရမယ်။ အဲ့အတွက်ကြောင့် hash table ကို သုံးပြီး lookup table ပုံစံမျိုးတစ်ခုဖန်တီးမယ်။ အရှေ့ article မှာတုန်း က heap data represent လုပ်ခဲ့တုန်းက ပြောခဲ့သလိုပဲ element node value တွေကို array index (position value) တွေနဲ့ တွဲပြီးဆွဲထုတ်ပြခဲ့သေးတယ်။ အဲ့လိုပုံစံမျိုးပါပဲ။
Table မှာ column နှစ်ခုရှိမယ်၊ တစ်ခု က element တွေရဲ့ actual value ကိုပြမယ်။ နောက်တစ်ခုကသူ့တို့ရဲ့ position key (array index value) တွေပြထားမယ်။ ဆိုတော့ ကျနော်တော့ element တစ်ခု ဖျက်ချင်ပြီဆို table ထဲမှာ သူ့ရဲ့ position key ကိုသွားရှာလိုက်ခြင်းအားဖြင့် element ဘယ်နေရာမှာရှိတယ်ဆိုတာသိလိုက်ရပြီ၊ tree တစ်ခုလုံးတစ်ဆင့်ခြင်းလိုက်ရှာနေစရာမလိုတော့ပါဘူး။
ဒီနေရာမှာ စဉ်းစားစရာတစ်ခု ရှိလာတာက element value တူတာတွေရှိလာရင်ရော ဘယ်လို select လုပ်မလဲပေါ့။ လောလောဆယ် ကျနော်တို့လုပ်ထားတဲ့ lookup က element value တစ်ခု ကို position array value တစ်ခု လုပ်ထားတယ်။ ဒီလို scenario မျိုးအတွက် ဆိုရင်တော့ ကျနော်တို့ element value တစ်ခုအတွက် multiple position value ထားလို့ရပါတယ်။ element value က 7 လို့ပဲဆိုပါစို့ ။ 7 => 4,5,9 အဲ့လို table ထဲမှာ store လုပ်ထားလို့ရပါတယ်။ (fig 1 မှာ sample image ပါပါတယ်)။
Heap Data Presentation With Hash Lookup table
Hash table အကြောင်းလဲ နားလည်သွားပြီဆိုတော့ သူ့ကိုသုံးပြီးတော့ data operation ဘယ်လိုလုပ်လဲပြောကြည့်ရအောင်။ process တော်တော်များများကတော့ အတူတူပဲဖြစ်တဲ့အတွက်အရမ်းကြီးတော့ စိမ်းမှာမဟုတ်လောက်ပါဘူး။
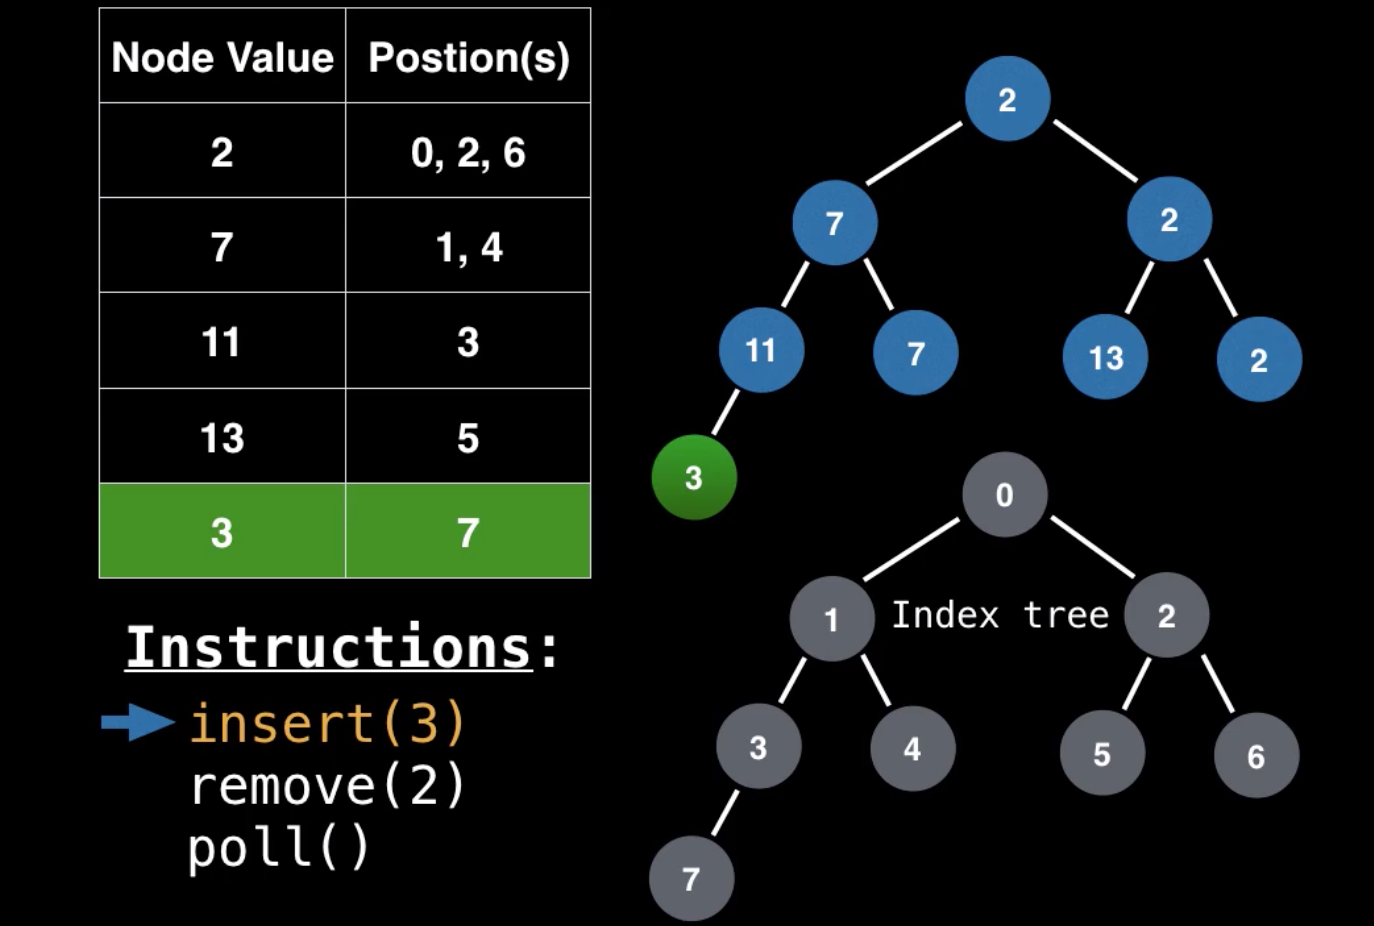
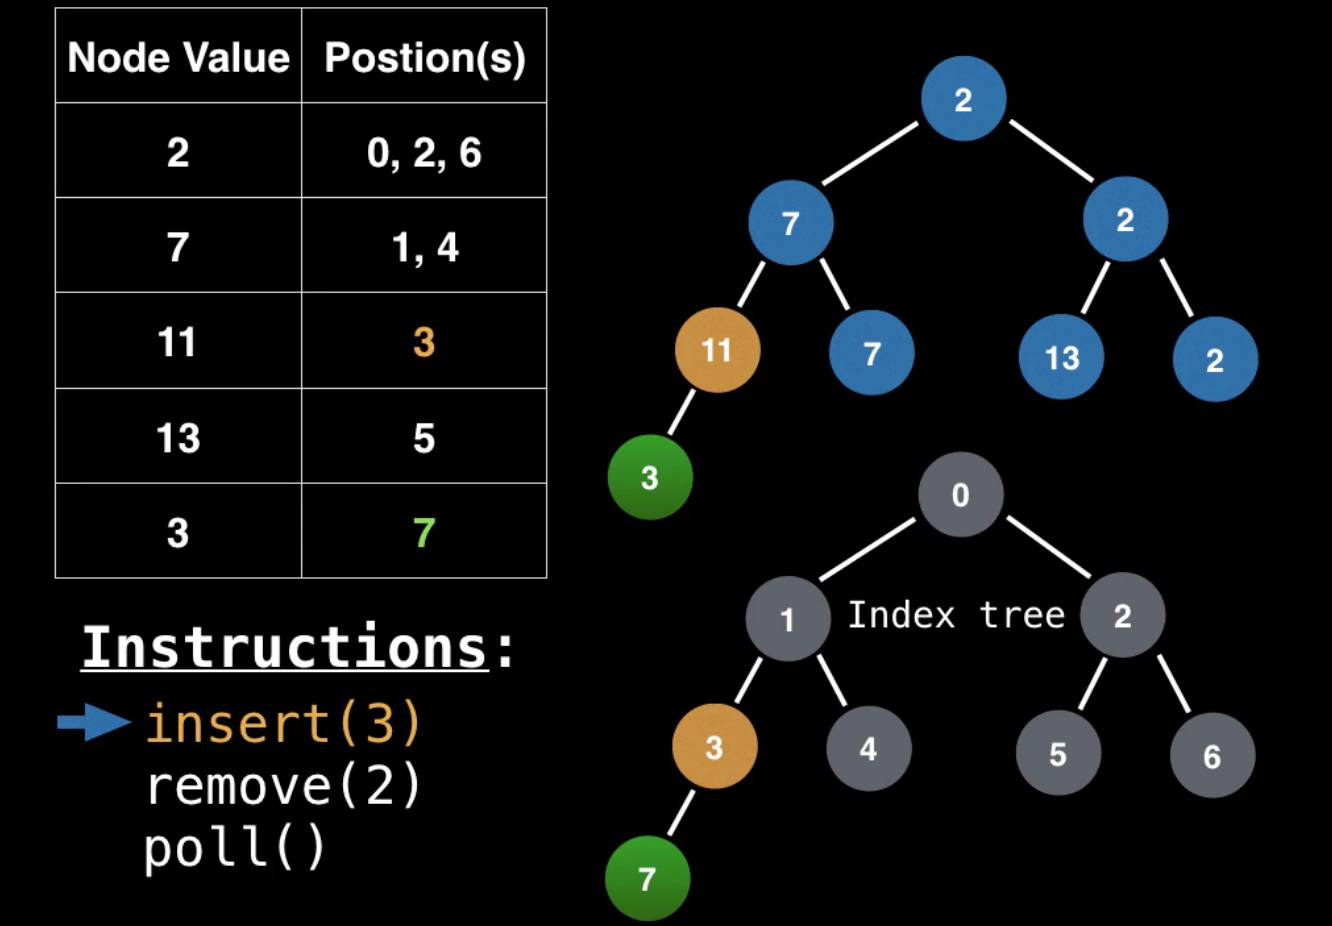
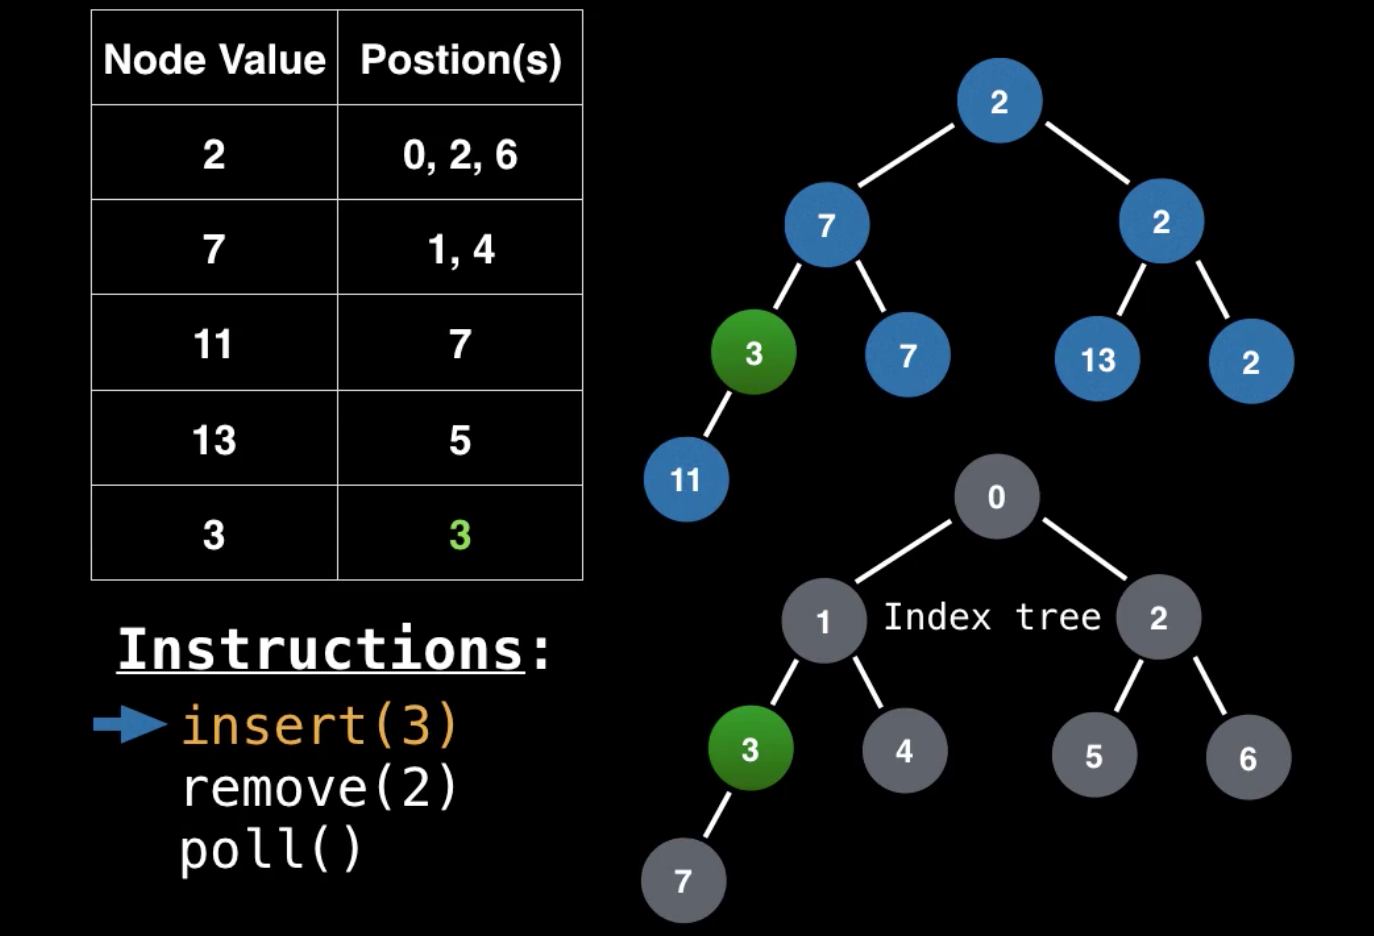
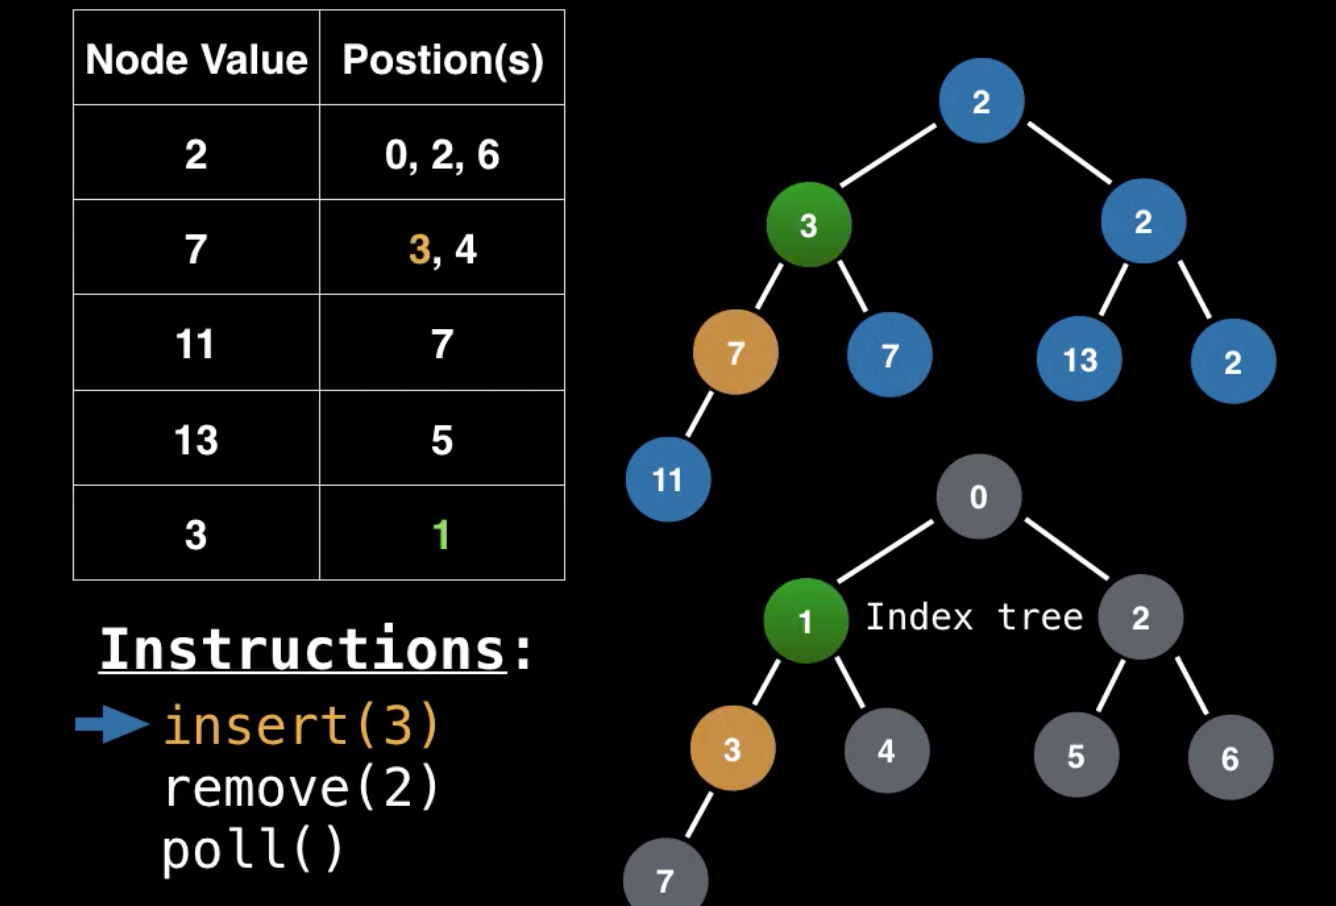
Insert ထည့်တော့မယ်ဆို ပုံမှန်အတိုင်းပဲ အောက်ဆုံးအတန်းက နေ left to right သွားတယ်။ ထည့်လိုက်ပြီဆိုတာနဲ့ lookup table မှာလည်း သူ့ရဲ့ element value နဲ့ position value ဝင်သွားမယ်။ နောက်တစ်ဆင့် အနေနဲ့ heap invariant ဖြစ်အောင် bubbling up လုပ်တယ်။ tree မှာ bubbling up လုပ်နေတိုင်းမှာ lookup table မှာလည်း position value တွေ swap လုပ်လုပ်သွားတယ်။ (fig 2.1 to fig 2.4 inserting data using lookup ကပုံတွေနဲ့ တွဲကြည့်ပါ)။
Inserting Data With Lookup Table
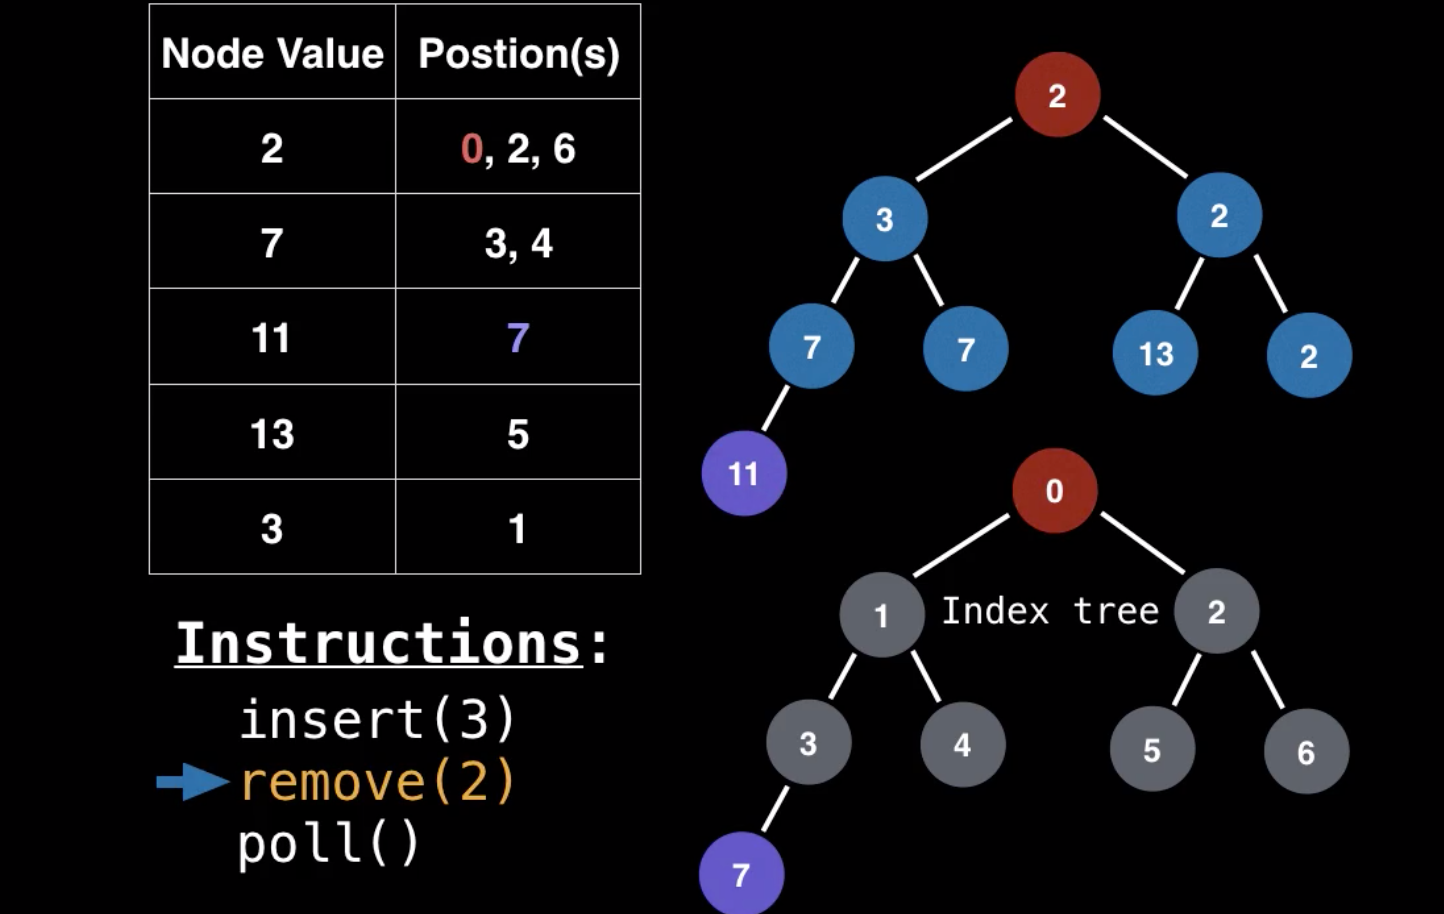
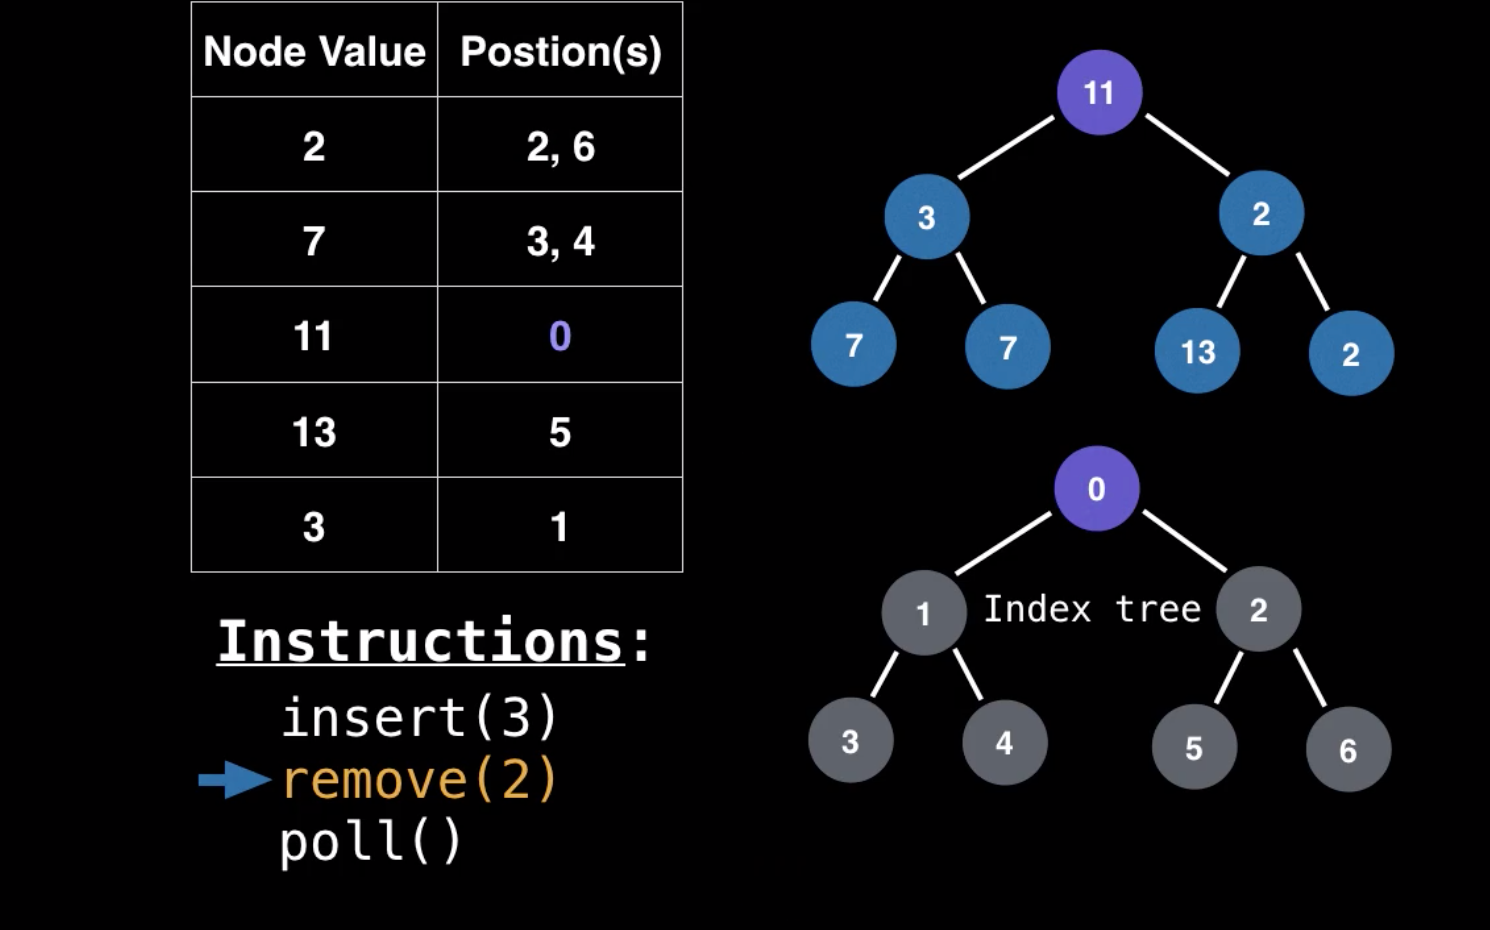
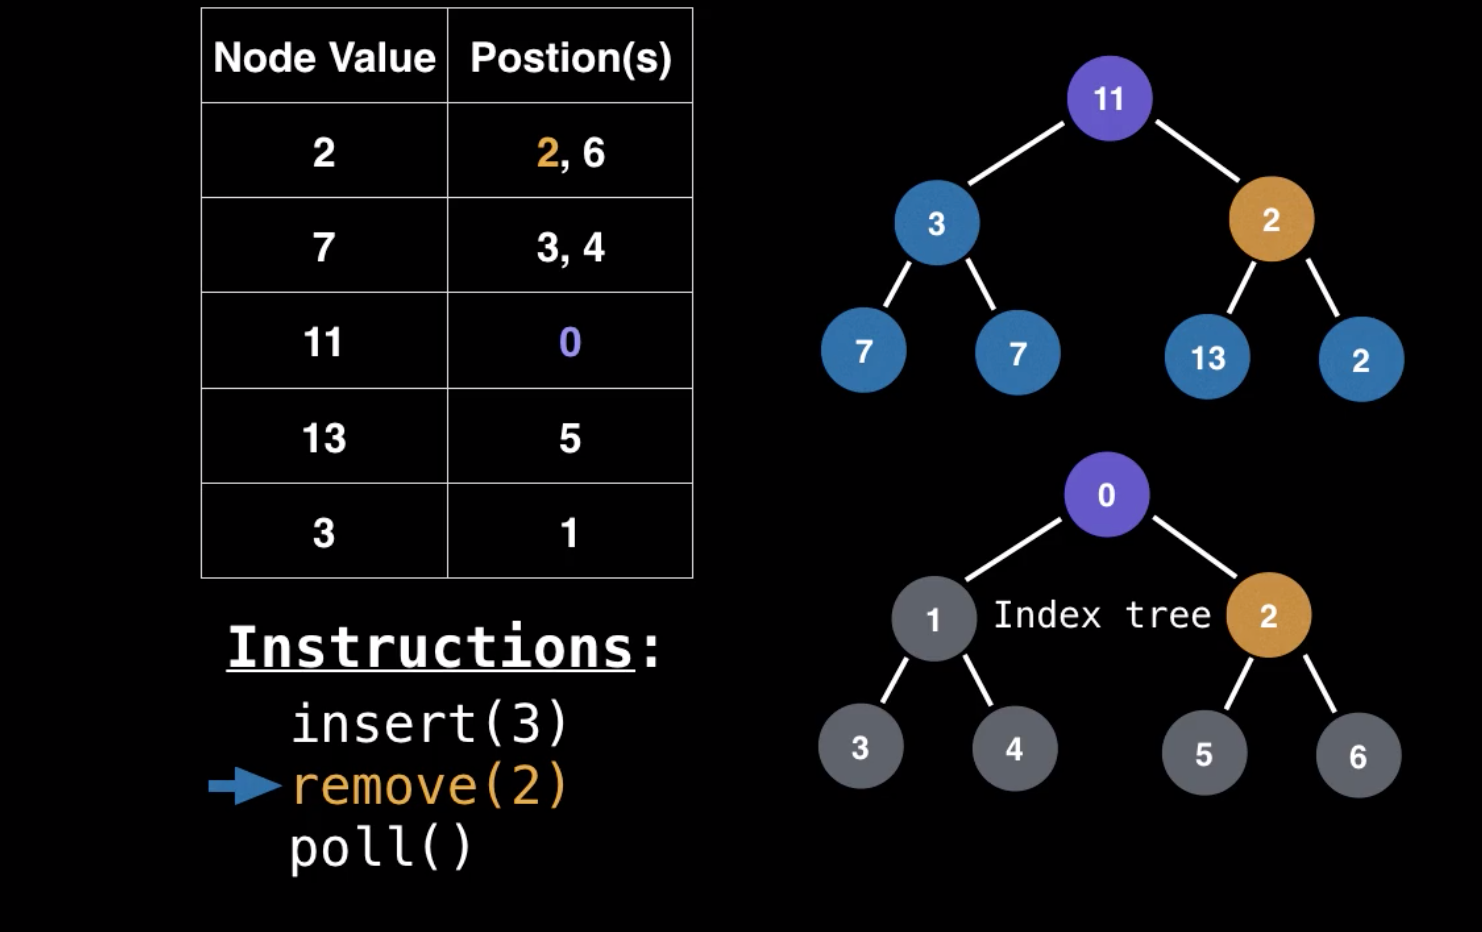
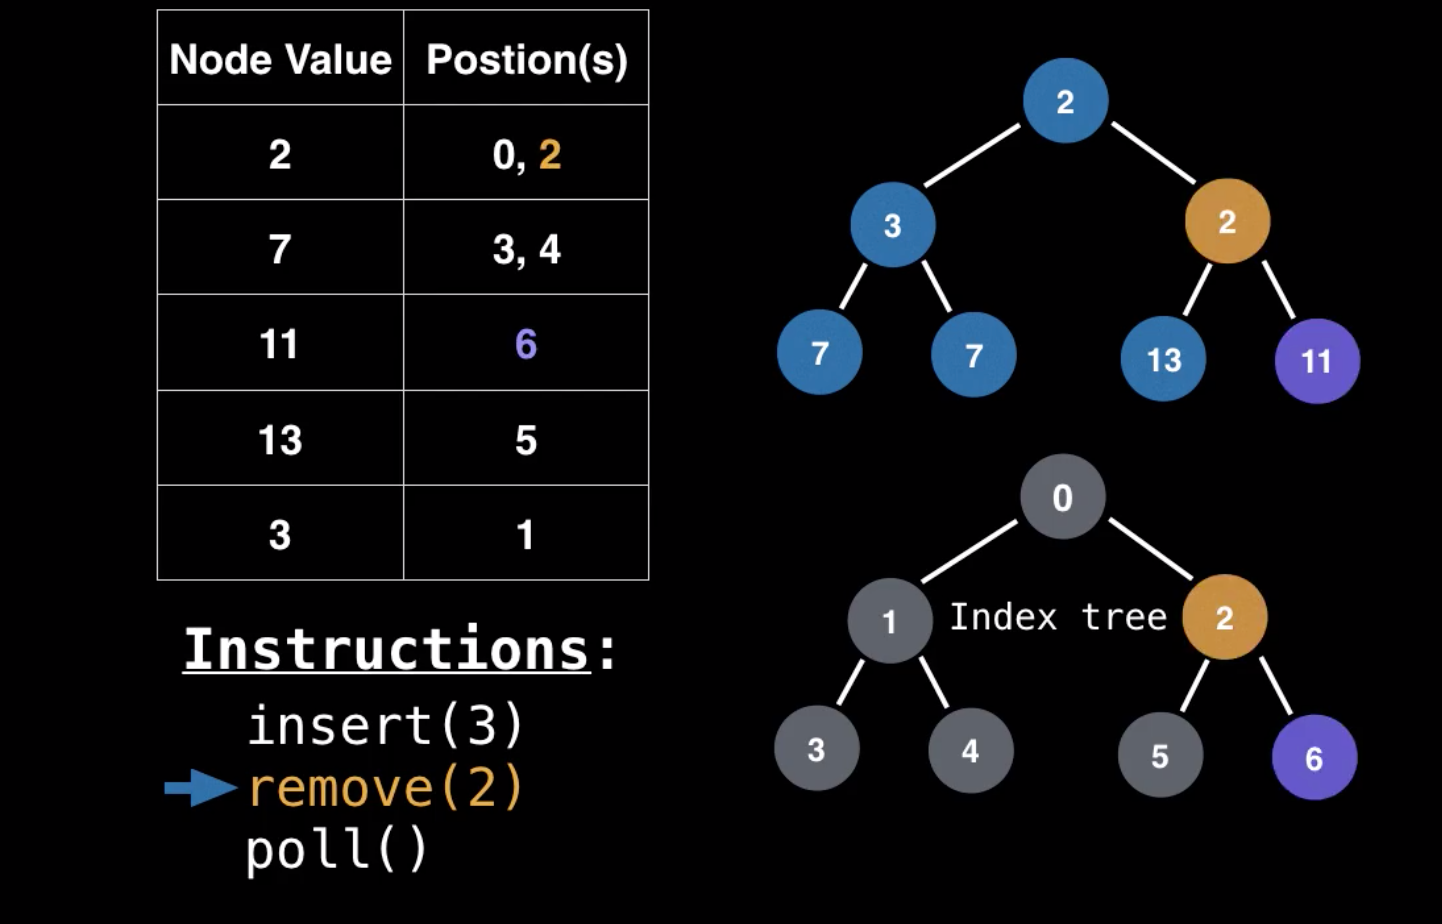
Remove operation ကလဲထုံးစံအတိုင်းပဲ ဖျက်မယ့် key ကို lookup table ထဲမှာသွားရှာတယ်။ ဒါပေမဲ့ မေးစရာတစ်ခုရှိတာက same value , multiple position ဖြစ်တဲ့ကောင်တွေအတွက်ဆိုရင်ရော ဘယ်လိုလုပ်မလဲပေါ့။ အဖြေက တော့ ကြိုက်တဲ့ position ကကောင်ကို ယူဖျက်လိုက်လို့ရပါတယ်၊ ဖျက်ပြီး နောက်ဆုံးမှာ heap invariant ဖြစ်အောင် လုပ်နိုင်ရင်ရပါပြီ။ position key ရပြီဆိုရင် ပုံမှန်လုပ်နည်းအတိုင်းပဲ ဖျက်ရမယ့် value နဲ့ tree ရဲ့ နောက်ဆုံး value ကို swap လုပ်တယ်၊ ပြီးတော့ နောက်ဆုံး value ကို ဖျက်တယ်။ swap လုပ်လိုက်တဲ့ value ကို heap invariant ဖြစ်အောင် bubbling up or down ပြန်လုပ်တယ်။ (fig 3.1 to fig 3.4 removing data using lookup ကပုံတွေနဲ့ တွဲကြည့်ပါ)။
Removing Data With Lookup Table
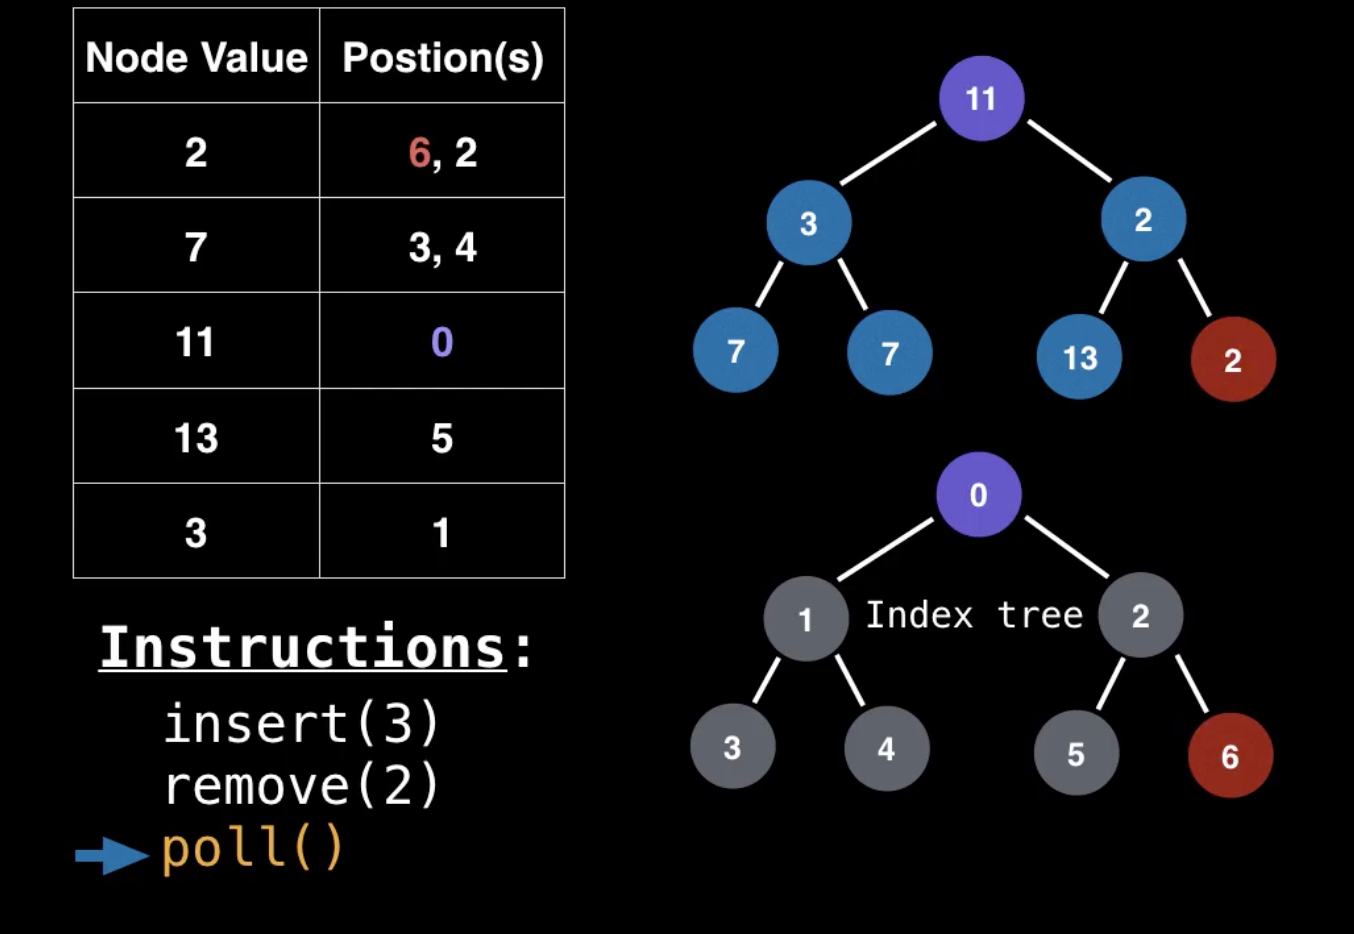
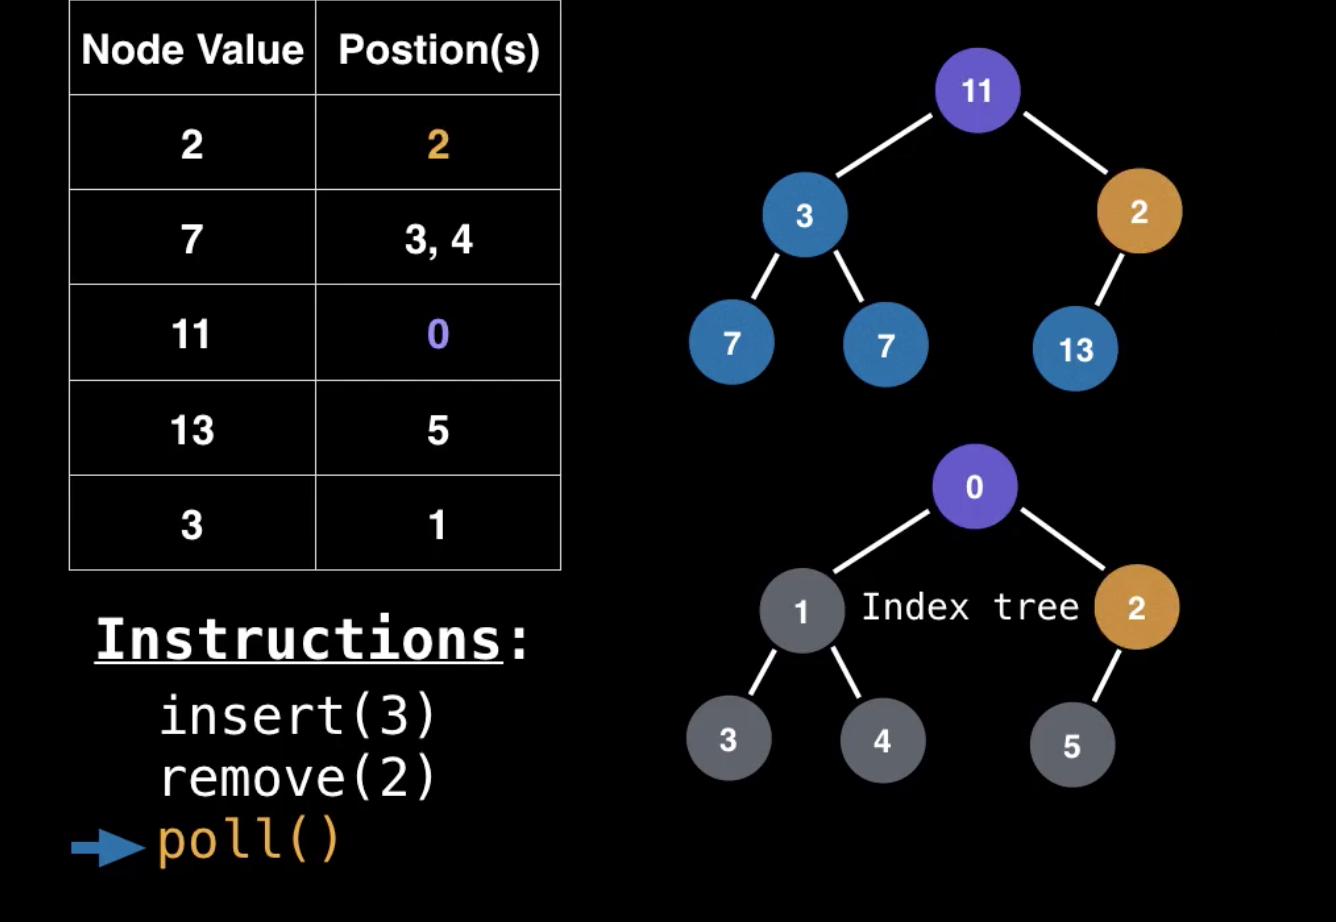
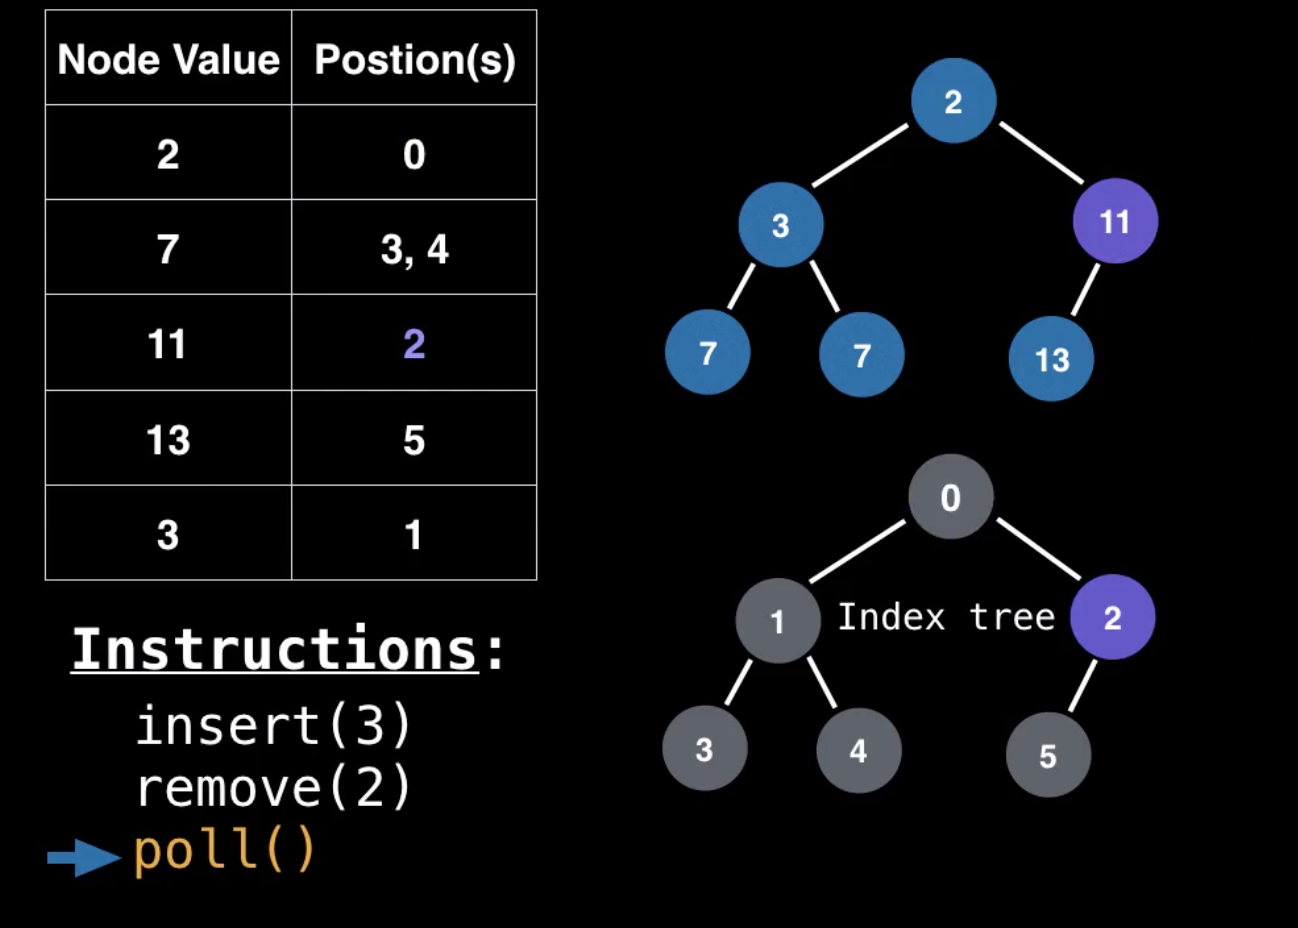
Polling ကတော့ ဘာမှပြောင်းလဲတာသိပ်မရှိဘူး။ နောက်ဆုံး value ကို ထိပ်ဆုံးက root value နဲ့ swap လုပ်တယ်။ ပြီးတော့ ဖျက်တယ်၊ ထိပ်ဆုံးရောက်သွားတဲ့ value ကို bubble down ပြန်လုပ်တယ်။ tree မှာလုပ်သွားတဲ့ step တွေအတိုင်း lookup မှာလိုက်ပြောင်းတယ်။ (fig 4.1 to fig 4.3 polling data using lookup ကပုံတွေနဲ့ တွဲကြည့်ပါ)။
Polling Data With Lookup Table
ဒီလောက်ဆိုရင်တော့ heap အကြောင်းလည်း တော်တော်ရှင်းသွားပြီ။ hashtable အကြောင်းကိုလဲ intro ဝင်ပြီးသားဖြစ်သွားပါပြီ။ နောက် article တွေမှာ hashtable အကြောင်းထပ်ရေးပေးသွားပါမယ်။
photos credit to Udemy
Last updated